
HTML tables is the most popular in websites to visually a good way to display the tabular data with a beautiful design using rows and columns and better you under with html tables with examples.

In most cases, HTML Tables are used by developers or owners are convenient to display a large amount of data like details of the text, links, price, pros, and cons, ideas, modified edits and updates, Images.., etc.
You can arrange data structured very nicely and recent data's use of the table in the website has become more popular and HTML tables are created very easier to design.
That's why in this article, we are going to learn and how to create html tables with examples its representative uses of tables and structure.
what is a HTML Table?
An HTML table is used to create a <table> tag with starting tag and </table> end tag between many columns and rows with the help of tag , tag and tag elements.
In each table and cells are defined :
- <tr>- tr defines table row.
- <th>-th defines table heading.
- <td>-td defines table data.
And the structure of Html Table with examples are:
<table>
<thead>
<tr>
    <th></th>
</tr>
</thead>
<tbody>
<tr>
   <td></td>
</tr>
</tbody>
<tfoot>
<tr>
<td></td>
</tr>
</tfoot>
</table>
HTML Tables Examples:
In this html code to show use of html tables-
  <!DOCTYPE html>
<html>
 <head>
   <title>chandralivetech</title>
</head>
<body>
    <table>
        <tr>
            <th>Student ID</th>
            <th>Student Name</th>
            <th>Gender</th>
            <th>Age</th>
            <th>Address</th>
        </tr>
        <tr>
            <td>1</td>
            <td>Anbumanan</td>
            <td>Male</td>
            <td>23</td>
            <td>123,street,chennai,India</td>
        </tr>
        <tr>
            <td>2</td>
            <td>Veronica</td>
            <td>Female</td>
		  <td>21</td>
		  <td>234,bv street,chennai,India</td>
        </tr>
        <tr>
            <td>3</td>
            <td>Chandrakumar</td>
            <td>Male</td>
		   <td>23</td>
		   <td>213,street,chennai,India</td>
        </tr>
	    <tr>
            <td>4</td>
            <td>Aravind</td>
            <td>Male</td>
		  <td>23</td>
		  <td>212,xtz street,chennai,India</td>
        </tr>
    </table>
</body>
 </html>
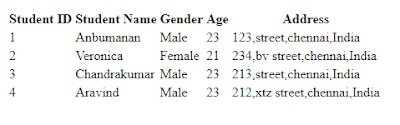
HTML Table border
  <!DOCTYPE html>
<html>
 <head>
 <style>
 table,td,th
{
border:1px solid #333;
border-collapse:collapse;
}
 </style>
 </head>
<body>
 <h1>HTML Tables With borders:</h1>
<table>
        <tr>
            <th>Student ID</th>
            <th>Student Name</th>
            <th>Gender</th>
            <th>Age</th>
            <th>Address</th>
        </tr>
        <tr>
            <td>1</td>
            <td>Anbumanan</td>
            <td>Male</td>
            <td>23</td>
            <td>123,street,chennai,India</td>
        </tr>
        <tr>
            <td>2</td>
            <td>Veronica</td>
            <td>Female</td>
		  <td>21</td>
		  <td>234,bv street,chennai,India</td>
        </tr>
        <tr>
            <td>3</td>
            <td>Chandrakumar</td>
            <td>Male</td>
		  <td>23</td>
		 <td>213,street,chennai,India</td>
        </tr>
		<tr>
            <td>4</td>
            <td>Aravind</td>
            <td>Male</td>
		  <td>23</td>
		  <td>212,xtz street,chennai,India</td>
        </tr>
    </table>
</body>
</html>

HTML Tables Style:
In the CSS width property we can adjust the width of the table and spacing.
style:
table{width:100%;}
table,td,th
{
border:1px solid #333;
border-collapse:collapse;
}
  <!DOCTYPE html>
<html>
 <head>
 <style>
 table{width:100%;}
 table,td,th {border:1px solid #333;border-collapse:collapse;}
 </style>
 </head>
<body>
 <h1>HTML Tables With width adjustment:</h1>
<table>
        <tr>
            <th>Student ID</th>
            <th>Student Name</th>
            <th>Gender</th>
            <th>Age</th>
            <th>Address</th>
        </tr>
        <tr>
            <td>1</td>
            <td>Anbumanan</td>
            <td>Male</td>
            <td>23</td>
            <td>123,street,chennai,India</td>
        </tr>
        <tr>
            <td>2</td>
            <td>Veronica</td>
            <td>Female</td>
			<td>21</td>
			<td>234,bv street,chennai,India</td>
        </tr>
        <tr>
            <td>3</td>
            <td>Chandrakumar</td>
            <td>Male</td>
			<td>23</td>
			<td>213,street,chennai,India</td>
        </tr>
		<tr>
            <td>4</td>
            <td>Aravind</td>
            <td>Male</td>
			<td>23</td>
			<td>212,xtz street,chennai,India</td>
        </tr>
    </table>
</body>
</html>

How to Add a Caption to a Html Tables with Examples
A HTML Tables caption is known as table caption that is mentioned immediately inserted <table> tag. the caption is the main use of providing a description about the table of data and the caption is the default on top of the table and caption-side use of the tag in CSS to mention top | bottom.
Caption Examples:
  <table id="caption">
<caption>HTML Tables Caption:</caption>
        <tr>
            <th>Student ID</th>
            <th>Student Name</th>
            <th>Gender</th>
            <th>Age</th>
            <th>Address</th>
        </tr>
        <tr>
            <td>1</td>
            <td>Anbumanan</td>
            <td>Male</td>
            <td>23</td>
            <td>123,street,chennai,India</td>
        </tr>
        <tr>
            <td>2</td>
            <td>Veronica</td>
            <td>Female</td>
			<td>21</td>
			<td>234,bv street,chennai,India</td>
        </tr>
        <tr>
            <td>3</td>
            <td>Chandrakumar</td>
            <td>Male</td>
			<td>23</td>
			<td>213,street,chennai,India</td>
        </tr>
		<tr>
            <td>4</td>
            <td>Aravind</td>
            <td>Male</td>
			<td>23</td>
			<td>212,xtz street,chennai,India</td>
        </tr>
    </table>

Caption Bottom:
  <style>
 table,td,th {border:1px solid #333;border-collapse:collapse;}
 #caption{caption-side:bottom;}
 </style>

rowspan and colspan Together in Html
A colspan are the table to span cell horizontal width of one or more column cell and rowspan are the table to span cell in vertical height.
colspan syntax:
<tr>
<th colspan='value'></th>
</tr>
Rowspan Syntax:
<tr>
<td rowspan="value"></td>
</tr>
colspan Examples:
  <table>
<tr>
  <th>ID</th>
  <th>Customer Name</th>
  <th>Product name</th>
  <th>Quatity</th>
  <th>Price</th>
  <th>Total Price</th>
</tr>
<tr>
   <td>1</td>
   <td>Ram</td>
   <td>Realme c1</td>
   <td>2</td>
   <td>6000</td>
   <td>12000</td>
</tr>
<tr>
   <td>2</td>
   <td>Chandra</td>
   <td>Iphone12</td>
   <td>1</td>
   <td>160000</td>
   <td>160000</td>
</tr>
<tr>
   <td>3</td>
   <td>Priya</td>
   <td>samsung Z fold</td>
   <td>1</td>
   <td>69000</td>
   <td>69000</td>
</tr>
<tr>
   <td>4</td>
   <td>veronica</td>
   <td>Realme c20</td>
   <td>5</td>
   <td>9000</td>
   <td>45000</td>
</tr>
<tr>
   <td colspan="5">Total Amount:</td>
   <td>2,86,000</td>
</tr>
<tr>
   <td colspan="4">Tax:</td>
   <td> 35%</td>
   <td>1,00,100</td>
</tr>
<tr>
   <td colspan="5">Tax Dedution Balance Amount:</td>
   <td id="color">1,85,900</td>
</tr>
</table>

Rowspan Example:
  <table>
<tr>
  <th>ID</th>
  <th>Customer Name</th>
  <th>Product name</th>
  <th>Quatity</th>
  <th>Price</th>
  <th>Total Price</th>
</tr>
<tr>
<td rowspan="4" >1</td>
   <td rowspan="4">Ram</td>
   <td>Realme c1</td>
   <td>2</td>
   <td>6000</td>
   <td rowspan="4" >17550</td>
</tr>
<tr>
<td>Ram DDR3 8GB</td>
<td>2</td>
<td>5000</td>
</tr>
<tr>

<td>DairyMilk</td>
<td>10</td>
<td>500</td>
</tr>
<tr>
<td>cotton candy</td>
<td>5</td>
<td>50</td>
</tr>
<!---first row end--->
<tr>
<td rowspan="2" >2</td>
   <td rowspan="2">Veronica</td>
   <td>Sony TV "50inch"</td>
   <td>1</td>
   <td>60000</td>
   <td rowspan="2" >63000</td>
</tr>
<tr>
<td>chromecast</td>
<td>1</td>
<td>3000</td>
</tr>
<tr>
</table>

rowspan and colspan Example
  <table>
<tr>
  <th>ID</th>
  <th>Customer Name</th>
  <th>Product name</th>
  <th>Quatity</th>
  <th>Price</th>
  <th>Total Price</th>
</tr>
<tr>
<td rowspan="4">1</td>
   <td rowspan="4" >Ram</td>
   <td>Realme c1</td>
   <td>2</td>
   <td>6000</td>
   <td rowspan="4">17550</td>
</tr>
<tr>
<td>Ram DDR3 8GB</td>
<td>2</td>
<td>5000</td>
</tr>
<tr>

<td>DairyMilk</td>
<td>10</td>
<td>500</td>
</tr>
<tr>
<td>cotton candy</td>
<td>5</td>
<td>50</td>
</tr>
<!---first row end--->
<tr>
<td rowspan="2">2</td>
   <td rowspan="2" >Veronica</td>
   <td>Sony TV "50inch"</td>
   <td>1</td>
   <td>60000</td>
   <td rowspan="2" >80550</td>
</tr>
<tr>
<td>chromecast</td>
<td>1</td>
<td>3000</td>
</tr>
<tr>
<tr>
   <td colspan="5" >Total Amount:</td>
   <td>2,86,000</td>
</tr>
<tr>
   <td colspan="4" >Tax:</td>
   <td id="negative"> 35%</td>
   <td id="negative">28192.50</td>
</tr>
<tr>
   <td colspan="5">Tax Dedution Balance Amount:</td>
   <td id="colspan">52357.50</td>
</tr>
</table>

How to Add a thead ,tbody, tfoot in HTML Tables with Examples
  <style>
table, th, td {
  border: 1px solid black;
  padding:10px;
  border-collapse: collapse;
}
#colspan{background-color:#363636;color:#fff;}
#negative{background-color:red;color:#fff;}
#rowspan{background-color:yellow;color:#363636;}
</style>
  <table>
<thead>
<tr>
  <th>ID</th>
  <th>Customer Name</th>
  <th>Product name</th>
  <th>Quatity</th>
  <th>Price</th>
  <th>Total Price</th>
</tr>
</thead>
<tbody>
<tr>
<td rowspan="4" id="rowspan">1</td>
   <td rowspan="4" id="rowspan">Ram</td>
   <td>Realme c1</td>
   <td>2</td>
   <td>6000</td>
   <td rowspan="4" id="rowspan">17550</td>
</tr>
<tr>
<td>Ram DDR3 8GB</td>
<td>2</td>
<td>5000</td>
</tr>
<tr>

<td>DairyMilk</td>
<td>10</td>
<td>500</td>
</tr>
<tr>
<td>cotton candy</td>
<td>5</td>
<td>50</td>
</tr>
<!---first row end--->
<tr>
<td rowspan="2" id="rowspan">2</td>
   <td rowspan="2" id="rowspan">Veronica</td>
   <td>Sony TV "50inch"</td>
   <td>1</td>
   <td>60000</td>
   <td rowspan="2" id="rowspan">80550</td>
</tr>
<tr>
<td>chromecast</td>
<td>1</td>
<td>3000</td>
</tr>
<tr>
<tr>
   <td colspan="5" id="colspan">Total Amount:</td>
   <td>2,86,000</td>
</tr>
<tr>
   <td colspan="4" id="negative">Tax:</td>
   <td id="negative"> 35%</td>
   <td id="negative">28192.50</td>
</tr>
</tbody>
<tfoot>
<tr>
   <td colspan="5">Tax Dedution Balance Amount:</td>
   <td id="colspan">52357.50</td>
</tr>
</tfoot>
</table>

Post a Comment